Battle Report - Return to Castra II
After a short hiatus used to complete other projects in life, I’m finally back with another campaign battle report.
For the past several weeks a friend and I have been doing games in support of a campaign centered in Cleveland, TN at Dicehead Games & Comics. The first battle report I posted was for the beginning mission in this campaign, and pitted my Tau Empire forces in an invasion role against the Space Marines.
Since that game we have played several others, including an Apocalypse mega-battle where Chaos, Necrons, and Tau were able to overwhelm the Imperial/Eldar defenses on the moon Kryo and detonate explosives within the moon, destroying it in the process. Shane, the owner of Dicehead, has done a great job since then of giving us missions where the Imperials are really on the back foot, struggling to turn back the tide of invading forces. The battle report that follows represents one of those games.
Return to Castra II
The Mission
The Tau Empire is still on the offensive, driving the Imperials back as they go. This mission uses the Crucible of War mission described on page 346 of the Main Rulebook, but we also use Preliminary Bombardment every player turn to represent the terrible debris falling after the destruction of Kryo. The stats we were attempting to control for purposes of the campaign were:
-Points Played
-Winner and Loser Victory Points Total
-Did either side suffer more than 80% casualties?
“They still refuse to yield,” O’Mal’Caor shook his head as he spoke. “They are tenacious, I will give them that much.”
“The Greater Good thrives despite adversity, Commander,” came the voice of Aun’ui Tai’go. “These gue’ron’sha are an admirable foe, and their tireless resistance sharpens our own resolve. Once they have been eliminated, we will do whatever is necessary to see the system saved from the forces of Chaos.”
Silence descended between the two leaders as they stared at the pict-screen. The defenses were still several miles away. Crisis Teams and Stealth Groups were checking their systems one last time, ensuring they were prepared to do their part. Behind them, a wall of Tau armor waited to be unleashed. O’Mal’Caor felt his blood rush at the prospect of war against this worthy foe.
“We will not fail, Aun’ui. The Greater Good must prevail.”
Army Lists

HQ
Commander: 2x Missile Pod, Target Lock, Drone Controller; XV-08 Crisis “Iridium” Battlesuit, 2 Marker Drones
Ethereal
ELITES
XV8 Crisis Team: Crisis Shas’vre with Drone Controller, Command & Control Node, Multi-Spectrum Sensor Suite, and Puretide Engram Neurochip; 2 Crisis Shas’ui with 2x Missile Pod and Target Lock; 6 Marker Drones
XV8 Crisis Team: 3 Crisis Shas’ui with 2x Plasma Rifles and Advanced Targeting Systems
XV25 Stealth Team: Stealth Shas’vre with Homing Beacon and Burst Cannon; 2 Stealth Shas’ui with Fusion Gun and Target Lock; 3 Stealth Shas’ui with Burst Cannon
TROOPS
10 Fire Warriors: Devilfish transport with Twin Smart Missile Systems, Disruption Pod, and Sensor Spines
10 Fire Warriors: Devilfish transport with Twin Smart Missile Systems, Disruption Pod, and Sensor Spines
10 Fire Warriors: Devilfish transport with Twin Smart Missile Systems, Disruption Pod, and Sensor Spines
10 Fire Warriors: Devilfish transport with Twin Smart Missile Systems, Disruption Pod, and Sensor Spines
FAST ATTACK
6 Marker Drones
HEAVY SUPPORT
Hammerhead Gunship: Ion Cannon, Twin Smart Missile Systems, Disruption Pod, Sensor Spines, and Blacksun Filter
Hammerhead Gunship: Ion Cannon, Twin Smart Missile Systems, Disruption Pod, Sensor Spines, and Blacksun Filter

HQ
Captain: Artificer Armor, Thunder Hammer, Shield Eternal
ELITES
Sternguard Squad: 10 strong, 2 Heavy Flamers, 3 Combi-Meltas; Drop Pod transport
TROOPS
Tactical Squad: 10 strong, Plasma Cannon, Plasma Gun
Tactical Squad: 10 strong, Plasma Cannon, Plasma Gun
Tactical Squad: 10 strong, Multi-Melta, Meltagun, Sergeant has Combi-Melta and Melta Bombs; Drop Pod transport
Scout Squad: 5 strong; 4 Sniper Rifles, led by Sergeant Telion
FAST ATTACK
Assault Squad: 9 strong, 2 Flamers; Drop Pod transport
HEAVY SUPPORT
Centurion Devastator Squad: 3 strong, Grav Cannons with Grav Amps
Devastator Squad: 10 strong, 4 Lascannons
Devastator Squad: 10 strong, 4 Heavy Bolters
Pre-Game


The Aquila Strongpoint represents the vital bunker that the Imperials must defend at all costs. The Tau Empire is seeking to either destroy this bunker, disable its defenses, or steal vital information from its data stacks. In order to do this, the Tau Empire must move a model into base-to-base contact with the bunker; it must remain there for an entire game turn. If this happens, the Tau Empire receives three Victory Points. The Space Marines receive three Victory Points if they can keep a scoring unit either in or on the main bunker complex, while keeping the Tau from accomplishing their objective.
The Space Marines deployed first, but the mission forced them to leave D3 units in Reserve. With the roll of a 3, the Drop Pods still fulfilled this requirement. All of their forces had to deploy within 18” of the bunker.

The Lascannon Devastators deployed on the annex bunker’s battlements, while the Heavy Bolter Devastators deployed within the main complex. Each of the foot mobile Tactical Squads started the game within the flanking bastions, and the Centurions deployed in the rear trench in support. The Scout Squad Infiltrated into a ruin to the right of the main bunker. After their deployment, the Tau Empire received the first turn, with all of their forces moving on from the short board edge farthest from the primary objective. Any units with alternate deployment methods (Outflank, Deep Strike, etc.) are free to use them, and they all arrive automatically on the first turn to represent the planned assault.
Turn One


The Devilfish column rolled on at full speed from the board edge, eager to close with the primary objective before sustaining serious casualties. The Hammerheads came on in support, lining up shots on the exposed Devastators. The Stealth Team arrived from Outflank on the Tau’s right flank, activating their Homing Beacon and bringing the Crisis Teams and Commander safely into position for the Mont’ka.
The Commander’s Drones designated the Devastators with Markerlights for the Hammerheads, which resulted in four dead Marines. The Stealth Suits targeted the closest Bastion with their Fusion weaponry but failed to produce a hit. The other Crisis Team wiped out Telion and his Scouts with their Missile Pods, marking the Centurions for the Plasma suits. The Plasma Rifles then claimed the nearest two Centurions, cutting them down due to their lack of cover.

The Devastators fell back from the roof of the bunker annex, moving into the trench with the Centurions.
The Space Marines used their Tactical Doctrine this turn as their Drop Pods came down. The Assault Marines landed near the Commander and his Drones, and the Tactical Squad inserted before the advancing Devilfish column. The Stealth Team lost four members to the Assault Marines’ Flamers, and two Plasma Suits were punched down by the Devastators. Both Missile Pod suits were slain by the lone Centurion, failing two cover saves and two armor saves. The Tactical Squad was unable to get passed the 3+ Jink Save on the Devilfish for moving Flat Out. At this point both Crisis Teams broke and ran for the board edge.
Bunker Secure? Yes
Additional Tau Points: First Blood, Linebreaker, Casualties <80%
Additional Space Marine Points: Linebreaker, Casualties <80%
Turn One Score: 2-1 Tau
Turn Two
The Tau leapt into action by disembarking all of the Fire Warriors while the Ethereal invoked the Storm of Fire ability. The Crisis Teams continued to fall back towards the board edge, leaving the Commander and the two surviving Stealth Shas’ui without support.
The Commander’s Drones marked the Assault Squad, while the Commander knocked down an Assault Marine with his Missile Pods. The Hammerheads then fired two blasts into the Space Marines, killing all of them and wounding the Captain. The Fire Warriors used their impressive weight of fire, combined with Devilfish support, to cut down the entire Tactical Squad before them.
The Space Marine turn started well with the Orbital Bombardment killing one of the Commander’s Drones, Pinning him in the process! The wounded Captain closed with the Commander, eager to dispense some justice for his slain comrades. The Sternguard arrived from Reserve before the Tau army in Combat Squads, cutting down several Fire Warriors from two different squads. More fire from the Centurion and the Lascannon Devastators finished off the last of the Stealth Suits that were hunkering in the ruins. Finally, despite his close proximity, the Captain failed his charge roll against the Pinned Commander.

Bunker Secure? Yes
Additional Tau Points: First Blood, Linebreaker, Casualties <80%
Additional Space Marine Points: Linebreaker, Casualties <80%
Turn Two Score: 2-1 Tau
Turn Three
The Crisis Teams continued to fall back. The Commander’s unit was unable to hit with any Markerlights due to being Pinned. Two of the Fire Warrior Teams embarked upon their transports again and raced off for the primary bunker. Between the two Hammerheads and the remaining twenty Fire Warriors, all of the Sternguard were slain.

The Space Marine Centurion moved onto the battlements of the bunker annex, prepared to sell his life defending it. The Heavy Bolter Devastators reaped another great tally amongst the Fire Warriors, although the squad did go to ground to minimize incoming damage. The Centurion was able to Immobilize one of the approaching Devilfish, making it more difficult for the Tau to reach their objective.
The Space Marine Captain charged the Commander successfully this turn, bellowing a challenge as he came. A flurry of Drones intercepted his massive hammer, losing three of their number in the process. Despite these casualties they held against their fearsome opponent.
Bunker Secure? Yes
Additional Tau Points: First Blood, Casualties <80%
Additional Space Marine Points: None, Casualties <80%
Turn Three Score: 2-0 Tau
Turn Four
The two assaulting squads of Fire Warriors leapt from their transports and ran into contact with the main objective; the Space Marines would have one turn to remove them. The four Devilfish were all now in range of the Centurion Devastator standing on the roof. This model and the Heavy Bolter Devastators within would be the only units capable of striking at the Tau in contact with the bunker.
The flurry of Smart Missiles proved to be too much for the Centurion’s warsuit, and he fell to the ground riddled with smoking holes. The Captain fought his way through the Drones and issued a challenge once more, this time met by O’Mal’Caor as he leapt into the fray. The Captain passed the two wounds on his Artificer Armor and then hit with all of his attacks, finishing off the wounded Commander. The Drones broke and fled, only to be dispatched as the Captain ran them to ground.
At this point my opponent saw that he had no units in range to threaten the second squad of assaulting Fire Warriors, and conceded on a well-fought and brutal game.
Bunker Secure? No
Additional Tau Points: First Blood, Linebreaker, Casualties <80%
Additional Space Marine Points: Slay the Warlord, Casualties <80%
FINAL SCORE: 5-1, Tau Victory

The Shas’la slammed her back against the bunker wall, panting and flinching down as gue’ron’sha machine gun fire ripped overhead. The electronic systems within the bunker were protecting an entire Imperial garrison in the area; if they failed, the defenders would be vulnerable to an attack they did not know could be coming.
She spared one moment looking at the dead and dying Fire Warriors spread across the battlefield. The day had been costly, but ultimately it belonged to the Tau. She thumbed the activation rune on an EMP grenade and hurled it into the bunker.
For the past several weeks a friend and I have been doing games in support of a campaign centered in Cleveland, TN at Dicehead Games & Comics. The first battle report I posted was for the beginning mission in this campaign, and pitted my Tau Empire forces in an invasion role against the Space Marines.
Since that game we have played several others, including an Apocalypse mega-battle where Chaos, Necrons, and Tau were able to overwhelm the Imperial/Eldar defenses on the moon Kryo and detonate explosives within the moon, destroying it in the process. Shane, the owner of Dicehead, has done a great job since then of giving us missions where the Imperials are really on the back foot, struggling to turn back the tide of invading forces. The battle report that follows represents one of those games.
Return to Castra II
The Mission
The Tau Empire is still on the offensive, driving the Imperials back as they go. This mission uses the Crucible of War mission described on page 346 of the Main Rulebook, but we also use Preliminary Bombardment every player turn to represent the terrible debris falling after the destruction of Kryo. The stats we were attempting to control for purposes of the campaign were:
-Points Played
-Winner and Loser Victory Points Total
-Did either side suffer more than 80% casualties?
“They still refuse to yield,” O’Mal’Caor shook his head as he spoke. “They are tenacious, I will give them that much.”
“The Greater Good thrives despite adversity, Commander,” came the voice of Aun’ui Tai’go. “These gue’ron’sha are an admirable foe, and their tireless resistance sharpens our own resolve. Once they have been eliminated, we will do whatever is necessary to see the system saved from the forces of Chaos.”
Silence descended between the two leaders as they stared at the pict-screen. The defenses were still several miles away. Crisis Teams and Stealth Groups were checking their systems one last time, ensuring they were prepared to do their part. Behind them, a wall of Tau armor waited to be unleashed. O’Mal’Caor felt his blood rush at the prospect of war against this worthy foe.
“We will not fail, Aun’ui. The Greater Good must prevail.”
Army Lists
Vior'la Tok'rhenna Shi - Mont'ka Cadre
Tau Empire - 2,000

HQ
Commander: 2x Missile Pod, Target Lock, Drone Controller; XV-08 Crisis “Iridium” Battlesuit, 2 Marker Drones
Ethereal
ELITES
XV8 Crisis Team: Crisis Shas’vre with Drone Controller, Command & Control Node, Multi-Spectrum Sensor Suite, and Puretide Engram Neurochip; 2 Crisis Shas’ui with 2x Missile Pod and Target Lock; 6 Marker Drones
XV8 Crisis Team: 3 Crisis Shas’ui with 2x Plasma Rifles and Advanced Targeting Systems
XV25 Stealth Team: Stealth Shas’vre with Homing Beacon and Burst Cannon; 2 Stealth Shas’ui with Fusion Gun and Target Lock; 3 Stealth Shas’ui with Burst Cannon
TROOPS
10 Fire Warriors: Devilfish transport with Twin Smart Missile Systems, Disruption Pod, and Sensor Spines
10 Fire Warriors: Devilfish transport with Twin Smart Missile Systems, Disruption Pod, and Sensor Spines
10 Fire Warriors: Devilfish transport with Twin Smart Missile Systems, Disruption Pod, and Sensor Spines
10 Fire Warriors: Devilfish transport with Twin Smart Missile Systems, Disruption Pod, and Sensor Spines
FAST ATTACK
6 Marker Drones
HEAVY SUPPORT
Hammerhead Gunship: Ion Cannon, Twin Smart Missile Systems, Disruption Pod, Sensor Spines, and Blacksun Filter
Hammerhead Gunship: Ion Cannon, Twin Smart Missile Systems, Disruption Pod, Sensor Spines, and Blacksun Filter
The Death Spectres
Space Marines - 2,000

HQ
Captain: Artificer Armor, Thunder Hammer, Shield Eternal
ELITES
Sternguard Squad: 10 strong, 2 Heavy Flamers, 3 Combi-Meltas; Drop Pod transport
TROOPS
Tactical Squad: 10 strong, Plasma Cannon, Plasma Gun
Tactical Squad: 10 strong, Plasma Cannon, Plasma Gun
Tactical Squad: 10 strong, Multi-Melta, Meltagun, Sergeant has Combi-Melta and Melta Bombs; Drop Pod transport
Scout Squad: 5 strong; 4 Sniper Rifles, led by Sergeant Telion
FAST ATTACK
Assault Squad: 9 strong, 2 Flamers; Drop Pod transport
HEAVY SUPPORT
Centurion Devastator Squad: 3 strong, Grav Cannons with Grav Amps
Devastator Squad: 10 strong, 4 Lascannons
Devastator Squad: 10 strong, 4 Heavy Bolters
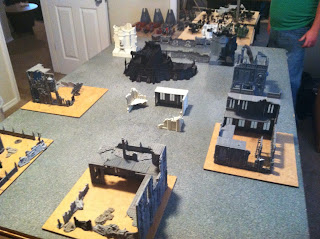
Pre-Game

The board pre-game, looking down from Tau board edge.

A view from the Space Marine side.

The bunker with the cannon represents the Primary Objective.
The Aquila Strongpoint represents the vital bunker that the Imperials must defend at all costs. The Tau Empire is seeking to either destroy this bunker, disable its defenses, or steal vital information from its data stacks. In order to do this, the Tau Empire must move a model into base-to-base contact with the bunker; it must remain there for an entire game turn. If this happens, the Tau Empire receives three Victory Points. The Space Marines receive three Victory Points if they can keep a scoring unit either in or on the main bunker complex, while keeping the Tau from accomplishing their objective.
The Space Marines deployed first, but the mission forced them to leave D3 units in Reserve. With the roll of a 3, the Drop Pods still fulfilled this requirement. All of their forces had to deploy within 18” of the bunker.

The Lascannon Devastators deployed on the annex bunker’s battlements, while the Heavy Bolter Devastators deployed within the main complex. Each of the foot mobile Tactical Squads started the game within the flanking bastions, and the Centurions deployed in the rear trench in support. The Scout Squad Infiltrated into a ruin to the right of the main bunker. After their deployment, the Tau Empire received the first turn, with all of their forces moving on from the short board edge farthest from the primary objective. Any units with alternate deployment methods (Outflank, Deep Strike, etc.) are free to use them, and they all arrive automatically on the first turn to represent the planned assault.
Turn One

The Tau race into position to begin the assault.

O'Mal'caor and his battlesuits take the fight to the enemy's flank.
The Devilfish column rolled on at full speed from the board edge, eager to close with the primary objective before sustaining serious casualties. The Hammerheads came on in support, lining up shots on the exposed Devastators. The Stealth Team arrived from Outflank on the Tau’s right flank, activating their Homing Beacon and bringing the Crisis Teams and Commander safely into position for the Mont’ka.
The Commander’s Drones designated the Devastators with Markerlights for the Hammerheads, which resulted in four dead Marines. The Stealth Suits targeted the closest Bastion with their Fusion weaponry but failed to produce a hit. The other Crisis Team wiped out Telion and his Scouts with their Missile Pods, marking the Centurions for the Plasma suits. The Plasma Rifles then claimed the nearest two Centurions, cutting them down due to their lack of cover.

The Devastators fell back from the roof of the bunker annex, moving into the trench with the Centurions.
The Space Marines used their Tactical Doctrine this turn as their Drop Pods came down. The Assault Marines landed near the Commander and his Drones, and the Tactical Squad inserted before the advancing Devilfish column. The Stealth Team lost four members to the Assault Marines’ Flamers, and two Plasma Suits were punched down by the Devastators. Both Missile Pod suits were slain by the lone Centurion, failing two cover saves and two armor saves. The Tactical Squad was unable to get passed the 3+ Jink Save on the Devilfish for moving Flat Out. At this point both Crisis Teams broke and ran for the board edge.
Bunker Secure? Yes
Additional Tau Points: First Blood, Linebreaker, Casualties <80%
Additional Space Marine Points: Linebreaker, Casualties <80%
Turn One Score: 2-1 Tau
Turn Two
The Tau leapt into action by disembarking all of the Fire Warriors while the Ethereal invoked the Storm of Fire ability. The Crisis Teams continued to fall back towards the board edge, leaving the Commander and the two surviving Stealth Shas’ui without support.
The Commander’s Drones marked the Assault Squad, while the Commander knocked down an Assault Marine with his Missile Pods. The Hammerheads then fired two blasts into the Space Marines, killing all of them and wounding the Captain. The Fire Warriors used their impressive weight of fire, combined with Devilfish support, to cut down the entire Tactical Squad before them.
The Space Marine turn started well with the Orbital Bombardment killing one of the Commander’s Drones, Pinning him in the process! The wounded Captain closed with the Commander, eager to dispense some justice for his slain comrades. The Sternguard arrived from Reserve before the Tau army in Combat Squads, cutting down several Fire Warriors from two different squads. More fire from the Centurion and the Lascannon Devastators finished off the last of the Stealth Suits that were hunkering in the ruins. Finally, despite his close proximity, the Captain failed his charge roll against the Pinned Commander.

Next turn, the Captain moves into position to ensure his charge doesn't miss again.
Bunker Secure? Yes
Additional Tau Points: First Blood, Linebreaker, Casualties <80%
Additional Space Marine Points: Linebreaker, Casualties <80%
Turn Two Score: 2-1 Tau
Turn Three
The Crisis Teams continued to fall back. The Commander’s unit was unable to hit with any Markerlights due to being Pinned. Two of the Fire Warrior Teams embarked upon their transports again and raced off for the primary bunker. Between the two Hammerheads and the remaining twenty Fire Warriors, all of the Sternguard were slain.

The Tau continue their advance as the last of the Sternguard fall.
The Space Marine Centurion moved onto the battlements of the bunker annex, prepared to sell his life defending it. The Heavy Bolter Devastators reaped another great tally amongst the Fire Warriors, although the squad did go to ground to minimize incoming damage. The Centurion was able to Immobilize one of the approaching Devilfish, making it more difficult for the Tau to reach their objective.
The Space Marine Captain charged the Commander successfully this turn, bellowing a challenge as he came. A flurry of Drones intercepted his massive hammer, losing three of their number in the process. Despite these casualties they held against their fearsome opponent.
Bunker Secure? Yes
Additional Tau Points: First Blood, Casualties <80%
Additional Space Marine Points: None, Casualties <80%
Turn Three Score: 2-0 Tau
Turn Four
The two assaulting squads of Fire Warriors leapt from their transports and ran into contact with the main objective; the Space Marines would have one turn to remove them. The four Devilfish were all now in range of the Centurion Devastator standing on the roof. This model and the Heavy Bolter Devastators within would be the only units capable of striking at the Tau in contact with the bunker.
The flurry of Smart Missiles proved to be too much for the Centurion’s warsuit, and he fell to the ground riddled with smoking holes. The Captain fought his way through the Drones and issued a challenge once more, this time met by O’Mal’Caor as he leapt into the fray. The Captain passed the two wounds on his Artificer Armor and then hit with all of his attacks, finishing off the wounded Commander. The Drones broke and fled, only to be dispatched as the Captain ran them to ground.
At this point my opponent saw that he had no units in range to threaten the second squad of assaulting Fire Warriors, and conceded on a well-fought and brutal game.
Bunker Secure? No
Additional Tau Points: First Blood, Linebreaker, Casualties <80%
Additional Space Marine Points: Slay the Warlord, Casualties <80%
FINAL SCORE: 5-1, Tau Victory

The Shas’la slammed her back against the bunker wall, panting and flinching down as gue’ron’sha machine gun fire ripped overhead. The electronic systems within the bunker were protecting an entire Imperial garrison in the area; if they failed, the defenders would be vulnerable to an attack they did not know could be coming.
She spared one moment looking at the dead and dying Fire Warriors spread across the battlefield. The day had been costly, but ultimately it belonged to the Tau. She thumbed the activation rune on an EMP grenade and hurled it into the bunker.
+Exorcists+Shoulder+Pad.jpg)

Comments
Post a Comment